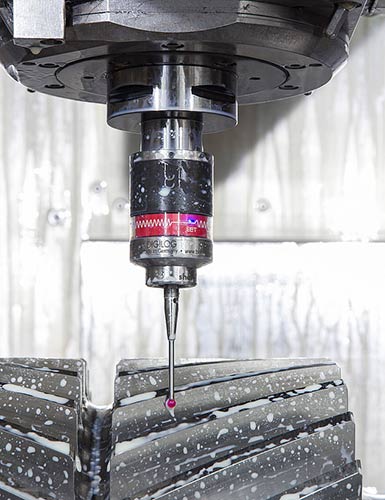
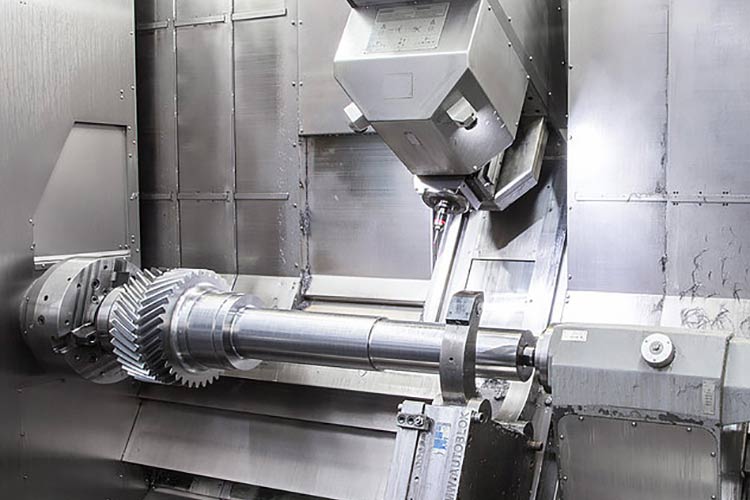
BLUM TC64-DIGILOG touch probe as a measurement gauge for drive shafts at Schuler Pressen.
What can be done when the production machines for an essential component have been discontinued and the process simply takes too long? At the Schuler Pressen, the decision was taken to find a new solution: producing gears using profile cutters. This is where Blum-Novotest’s TC64-DIGILOG scanning touch probe came into play: It enables examination of the tooth interlocking and ensures that the process as a whole is consistent and verifiable.
At the Schuler AG, gears for large press driveshafts have only been produced with the aid of special gear cutting machines in the past. These machines exhibit good repeatability characteristics, but the time taken to manufacture a driveshaft is very long. Shaping the gears alone takes between 16 and 19 hours. Moving the parts weighing nearly 700 kilogrammes between the various processing machines was also complicated and contributed to the long production times.
As the tried-and-tested machines were no longer available on the market, Schuler Pressen had to find other ways of tackling the production bottlenecks that were looming. The solution came in the form of milling the driveshafts on a modern turning/milling machining centre using a specially manufactured profile cutter, together with carrying out measurements in the machine itself. “Previously, we had no way of directly measuring the form deviations of the tooth flanks,” explains Thomas Vujica from the production planning and NC programming department. “That wasn’t required with the gear cutting machines, in fact, because they are constructed in such a way that there is always an involute. The question of measurement only became an issue when the gear production migrated to the turning/milling centre.” A workaround was found that involved transporting the heavy driveshafts to another company where each individual shaft was measured on a special measuring machine. However, depending on order backlogs and waiting times, that took two to three weeks. And that cancelled out the advantage in time that the milling technique brought with it.

The solution found by Schuler Pressen was the Blum-Novotest TC64-DIGILOG touch probe. The advantage of the DIGILOG touch probe is that it can carry out both digital measurements as well as analogue scans. This means that it is possible to guide the probe over a surface and register measurement data continuously.
The complete measurement of a cogwheel consists of 144 individual measurements on a slanted track along the whole tooth flank – 36 teeth with two flanks each, and in both halves of the double helical gear. The complete measurement procedure only takes 13 minutes at a scan speed of 1.8 m/min. During this time, the DIGILOG touch probe records 570,000 individual measurement values. However, only the linear axes are used during the scan so as to exclude any errors of the rotation axes used for production.
Software developed by Thomas Vujica allows for rapid inspection of the driveshaft. Using the network, the software adopts the measurement data recorded by the DIGILOG touch probe and generates a report including diagrams by way of illustration. The report provides a simple means of establishing whether there are deviations from the ideal form, and if so how big they are. This makes it possible to assess the manufacturing quality. The machine operator can keep track of the measurements on the PC as they are generated and differentiate between outliers caused by impurities and genuine quality issues. Also, the automated measurement technique avoids errors that cannot be prevented in the course of manual measurement.
Thanks to Blum-Novotest’s DIGILOG probe, production today is backed up by reliable quality assurance, the delivery times are significantly shorter and the production department can be sure of fulfilling the required gearing quality. In fact, it is possible to manufacture and dispatch a driveshaft within a single day if necessary. Previously, such times were unthinkable; the measurement process alone took two to three weeks. This is extremely valuable in a sector in which customers depend on absolute reliability. So Thomas Vujica is able to draw a positive conclusion: “The cooperation with BLUM and the internal specialist departments was excellent. We developed the measuring sequence together, optimizing it steadily and integrating it into the process. Thanks to the DIGILOG touch probe we now have a very fast and reliable manufacturing process that means we no longer have to rely on the old special machines for this component. It also enables us to achieve high economic viability and shorter response times. What more could one ask for?”
The Schuler AG, headquartered in Göppingen, is a technological and global market leader in the metal forming industry. The company provides presses, automation solutions, tools, process know-how and services for the entire metal forming industry. Founded by Louis Schuler in 1839, the company began to manufacture sheet metal processing machines in 1852. Schuler customers include automotive manufacturers and their suppliers as well as companies from the forging, household equipment, packaging, energy and electrical sectors. Schuler leads the way in the production of minting presses and also provides system solutions for the aerospace, railway and large pipe manufacturing industries.


